Showing posts with label DIY. Show all posts

Monday, 7 November 2022

Water works

 I love to grow veg in the poly tunnel and I love my garden but one part I really don't like is watering things. I forget, or my knees hurt, or I get distracted. I am terrible at remembering to do it consistently and unfortunately consistency is the key to successful veg growing.

Watching a section on Gardener's World about an allotment for a guy who is frequently away for periods during the growing season, I was interested in his 'self-watering' planters, or Wicking Pots. This is a system involving a reservoir of water, a wick to draw the water up, and the pot itself. There are absolutely heaps of items you can buy from the basic to the very high tech, but the principle is largely the same.

Our garden tends to the 'allotment chic' aesthetic rather than gadgetry. It felt much more fun to work out how to make them myself than to buy a system so I headed to Google to look at ways of making some wicking pots myself.

THE TRIAL

On the advice of some very helpful YouTube channels, we bought generic builders buckets from Wickes for a quid a go. These would be our resevoirs.

Reusing large plastic pots from shrubs we'd bought in the past would be fine for my cucumber and tomato plants. To hold up the pots I put upturned ice cream tubs in the buckets. This holds the pot proud of the bucket, creating more space for the reservoir.  I cut openings in the sides to let the water in, and in the top to allow air to escape as I pour water in.

As for wicks,  I took the worst of our old tea towels and a sweatshirt B has outgrown. I cut them into strips and pushed the ends through the holes in the base of each pot, long enough to dangle over the ice cream tub to the bottom of the bucket. 

Black builders buckets with upturned ice cream tubs inside

There are loads of different ways to lay out the wicking systems. I made three different ones so I can monitor the results and see which (if any!) is effective.

1) Four thick twisted sections of sweatshirt fabric running all the way up the sides of the pot and held in place by clothes pegs, with a piece of fabric across the bottom of the pot to stop any soil falling into the reservoir. 

2) Several short wicks leading to a thick layer of fabric in the base of the pot to water it from below only.

3) Loads of short croquet-hoop style wicks made from tea towels, both ends trailing to the resevoir and fiilling every one of the holes in the pot - a little but everywhere approach


You can see approaches 1 and 3 - I forgot to photograph the base layer type.

Next job was to fill the pots with peat free compost and plant the tomato and cucumber seedlings. I put in a cane to tie them to as they grew. The pot then went into the bucket - making sure the fabric wicks were hanging down to touch the bottom of the bucket - to sit securely on top of the ice cream tubs. Mark carried them into the poly tunnel for me and I filled the resevoirs from the water butt.


I found the top of the soil felt slightly damp for about 4 days - 5 if it was cooler out. This was great for my erratic watering; even more so later in the summer, when I once again tore the meniscus in my right knee and mobility became a bigger issue for me.  It was also great because our 8 days in Portugal meant my Very Excellent Mate Penny only had to pop over twice to water them.

The gorgeousness of Portugal

Truly fantastic holiday- and yes, you can read in a pool


RESULTS


Good things - 

  • stayed moist
  • needed little attention
  • plants survived heat waves and absences

Bad things - 

  • the insects! something clearly lay its eggs in the stagnant water at the bottom of the resevoirs
  • the smell when watering - disturbing the stagnant bit not only led to a swarm of flies but also a horrible stink
  • instability - the pots listed somewhat over the course of the summer so the plants grew at some inconvenient angles. I could pop a bit of stone or brick to wedge them upright in future

Learning points - 

  • FEED THE PLANTS.  I always used growbags with added fertiliser incorporated so it didn't occur to me I needed to regularly feed the plants. What can I say, I'm a twit.
  • put less water in the resevoir each time unless I was going away. By leaving so much standing water in the reservoir (because I thought the plants would be more thirsty than they were at the start) I ended up with the bugs/pong situation
  • wedge them in place so they don't tip to the side
I will definitely do it again. There was no observable difference in the growth of the plants or the effectiveness of the wicking systems whether tea towel, sweatshirt, long wicks, short wicks and croquet hoops, so that makes things easy. The wicks aren't reusable as the cotton is pretty disgusting after one season, but we always have some old rags, t-shirts or cloths around.

For a number of reasons we didn't have a successful tomato crop - the scary 40 degree temperatures stressed everything, the plants fruited late and didn't have time to ripen, and yes, for those on the back, I totally failed to regularly feed the poor things.

On the positive side, lots of green tomatoes means lots of green tomato chutney.

Green Tomato Chutney

  • 500g unripe tomatoes
  • 500g onions
  • 250g sultanas (or 125g plus 125g diced Bramley
  • 200g brown sugar
  • 1.5tsp salt
  • 1tsp cayenne pepper
  • 1tsp crushed cardamom seeds
  • 1tsp mustard seeds
  • 500ml vinegar - whatever type you have
Chop the tomatoes and onions, chuck everything into a pot and simmer uncovered for 45-75 minutes, depending how finely you diced things. When it's nice and reduced, put the hot churney into sterilised jars.

Ta-Da!


Saturday, 29 April 2017

Having a quail of a time


For my birthday this year Mark bought me six Cortunix Quail hens - 3 dark Japanese, 3 lighter and larger Italian. We spent much of the two week easter holiday building them a home.
Being a keen fan of Thinking Things Through, I read everything I could find online about quail keeping so we could build them a good environment. This is what I learnt:

Quail are game birds rather than poultry. Their eggs have a higher protein proportion than hen eggs,  and as such require a much higher level of protein in their feed. They are ground-dwelling and they don't need perches, just deep litter/bedding to snuggle down in at night. They are fully grown by 6-9 weeks and will start to lay eggs from that age if conditions are right. They don't usually eggs in a nest box, just wherever they feel sheltered and private. They tend to bury their eggs, so some furtling about is required to find them.


The demanding fluff balls  need an awful lot of light to lay eggs regularly - at least 12 to 14 hours a day.  If kept outside, like mine, they need shelter from rain, places to hide if they feel threatened and most of all protection from predators like rats. Because they are only the size of a handful, that means choosing a very small mesh. I read so many reports of quail decapitated because a predator reached through the bars and grabbed them.
The darker birds are Japanese quail

Quail can fly, unlike chickens.  They stay on the ground normally but like all migratory birds, are capable of flying vast distances when needed. They jump vertically like a crazed mini Harrier Jet when startled, so need a roof over than they won't knock them out if they smack into it.

Our chickens have a lot of freedom, and we've gone to significant trouble to allow them that. The quail? Not quite the same. You can let quail free range if you really want to, but only the once.

Not much is known about quail behaviour, really. I read a study from 1997 that was very interesting, but less academic sources are pretty vague. There's plenty of anecdotal information from people who keep quail but that varies widely, and as far as I can tell that's down to how the quail are housed and the proportion of hens to cockerels.  I have all hens, so that sorts out the noise issue (quail hens make tiny little peeps and chirrups) and the fighting that some breeders reported.

Lots of people asked me if I'd be keeping the quail in with the hens. No, they have different needs, a different diet and the chooks will easily kill the quail if they perceive them as competitors for food or shelter. Some people keep quail in the bottom of aviaries with flying birds like finches or budgies, but not with chickens.

A huge number of people seem to keep them as little egg (or meat) factories, kept on wire mesh cages with no opportunity to engage in natural behaviour like foraging, dust bathing, and generally being messy balls of fluff who love to scratch away on the ground for food and fling dirt and bedding everywhere. Quail can lay from such a young age and reach their full size for meat at the same age, so as a means of producing some of your own meat, I guess they are a pretty easy way to go.  17 days to hatch, 6 weeks to grow, then table-ready.  Not really my style but fair enough.
A number of (mostly US-based) bloggers and forum members have expressed disgust at the concept of putting the quail on anything other than mesh - "They will be standing in their own faeces! That's cruel and disgusting!" I feel this view misunderstands the needs of the animal to behave in a natural way.  When managed well, deep litter systems are clean and environmentally responsible, and even shallow litter isn't mucky if you clean it regularly. It's basic pet care.
I guess that's the main difference - my quail are pets with lovely fringe benefit of eggs, not next month's dinner, so I can afford to get attached.

Our 6 quail hens have over 15 square foot to play in. Recommendations went from half a square foot in a production-based set up, to one square foot per bird. Plenty of hobbyists had larger spaces, naturally, but the guidelines were really quite tiny. We figured if we have the space, why not give it too them?

I couldn't find any plans or blueprints for quail housing that suited my intentions. Those I found were  wire cages or walk-in aviaries. So I thought about what I'd learnt and we started from scratch.

We thought a scrappy bit of border near the house would be an ideal place eventually, but our lovely next door neighbours are having a large extension at the moment on the other side of the fence. That meant we needed something that could be moved to a temporary location.
The frame
Quail don't require a nest nor roosting bars like chickens. They do, however, value a place to retreat to when cold, frightened or in awful weather. we interpreted that as a small version of a nest box with a door we could fully shut if we need to herd the quail in there while clearing the run out.

Gonzo helps Mark measure the shelter
To stop predators digging their way into the quail house, we put a sheet of mesh on the bottom of the frame as well as on the sides. I painted the timber before we assembled it fully because painting through mesh is a pain. I chose a lovely sage green in a wood stain that was pet-safe. It's worth pointing out not all wood treatments are OK for animals, so it's important to check.

Gonzo remained a keen participant

Stapling the mesh to the underside of the frame
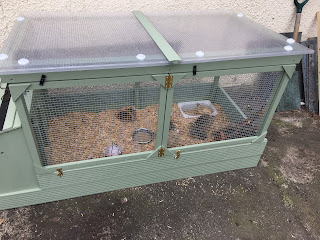
Ideally we wanted a clear solid roof (strong enough to cope with a badly behaved cat landing on it) which is able to let light in and sloped to let the rain run off.  We used dual walled polycarbonate sheets, which were very easy to cut to size fit. We have some offcuts as well, which we can slot into the doors to provide additional shelter in winter.


The project took us most of the Easter holidays, with numerous days off for going to the wildlife park, the safari park, generally being out and about and actually celebrating my birthday as well. Rain stopped play on a few occasions and waiting between coats for the paint to dry slowed us down too. Still, in the end we had a luxury dwelling fit for the most discerning of birds.
A 5* dwelling

A Quail Palace

The Versailles des Cailles

Last bits to paint after resolving snagging issues
Ta Da!

To make their habitat more interesting for them they have a dust bath ares, some plant pots, branches, shelter and foliage. They seem very happy, and hop about with excitement when something new arrives.
How many quail can bathe at once?

They had a tendency to spill or lose their food, so holes drilled in a plastic container (and filed to make sure the edges were smooth) allows them access to food without wasting it and without taking up too much space. 
Gonzo is pretty sure we made it for his amusement

Yesterday I got 5 eggs from the 6 of them for the first time, taking me up to a total of 29 eggs so far.  We've had them hard boiled as snacks, marinated in soy sauce and garlic to eat with ramen, soft boiled to eat with the new season's asparagus and today I'm trying them pickled. Local pals, if you fancy trying some, give me a shout. It looks like we'll have plenty!
J x