Showing posts with label preserves. Show all posts

Monday, 7 November 2022

Water works

 I love to grow veg in the poly tunnel and I love my garden but one part I really don't like is watering things. I forget, or my knees hurt, or I get distracted. I am terrible at remembering to do it consistently and unfortunately consistency is the key to successful veg growing.

Watching a section on Gardener's World about an allotment for a guy who is frequently away for periods during the growing season, I was interested in his 'self-watering' planters, or Wicking Pots. This is a system involving a reservoir of water, a wick to draw the water up, and the pot itself. There are absolutely heaps of items you can buy from the basic to the very high tech, but the principle is largely the same.

Our garden tends to the 'allotment chic' aesthetic rather than gadgetry. It felt much more fun to work out how to make them myself than to buy a system so I headed to Google to look at ways of making some wicking pots myself.

THE TRIAL

On the advice of some very helpful YouTube channels, we bought generic builders buckets from Wickes for a quid a go. These would be our resevoirs.

Reusing large plastic pots from shrubs we'd bought in the past would be fine for my cucumber and tomato plants. To hold up the pots I put upturned ice cream tubs in the buckets. This holds the pot proud of the bucket, creating more space for the reservoir.  I cut openings in the sides to let the water in, and in the top to allow air to escape as I pour water in.

As for wicks,  I took the worst of our old tea towels and a sweatshirt B has outgrown. I cut them into strips and pushed the ends through the holes in the base of each pot, long enough to dangle over the ice cream tub to the bottom of the bucket. 

Black builders buckets with upturned ice cream tubs inside

There are loads of different ways to lay out the wicking systems. I made three different ones so I can monitor the results and see which (if any!) is effective.

1) Four thick twisted sections of sweatshirt fabric running all the way up the sides of the pot and held in place by clothes pegs, with a piece of fabric across the bottom of the pot to stop any soil falling into the reservoir. 

2) Several short wicks leading to a thick layer of fabric in the base of the pot to water it from below only.

3) Loads of short croquet-hoop style wicks made from tea towels, both ends trailing to the resevoir and fiilling every one of the holes in the pot - a little but everywhere approach


You can see approaches 1 and 3 - I forgot to photograph the base layer type.

Next job was to fill the pots with peat free compost and plant the tomato and cucumber seedlings. I put in a cane to tie them to as they grew. The pot then went into the bucket - making sure the fabric wicks were hanging down to touch the bottom of the bucket - to sit securely on top of the ice cream tubs. Mark carried them into the poly tunnel for me and I filled the resevoirs from the water butt.


I found the top of the soil felt slightly damp for about 4 days - 5 if it was cooler out. This was great for my erratic watering; even more so later in the summer, when I once again tore the meniscus in my right knee and mobility became a bigger issue for me.  It was also great because our 8 days in Portugal meant my Very Excellent Mate Penny only had to pop over twice to water them.

The gorgeousness of Portugal

Truly fantastic holiday- and yes, you can read in a pool


RESULTS


Good things - 

  • stayed moist
  • needed little attention
  • plants survived heat waves and absences

Bad things - 

  • the insects! something clearly lay its eggs in the stagnant water at the bottom of the resevoirs
  • the smell when watering - disturbing the stagnant bit not only led to a swarm of flies but also a horrible stink
  • instability - the pots listed somewhat over the course of the summer so the plants grew at some inconvenient angles. I could pop a bit of stone or brick to wedge them upright in future

Learning points - 

  • FEED THE PLANTS.  I always used growbags with added fertiliser incorporated so it didn't occur to me I needed to regularly feed the plants. What can I say, I'm a twit.
  • put less water in the resevoir each time unless I was going away. By leaving so much standing water in the reservoir (because I thought the plants would be more thirsty than they were at the start) I ended up with the bugs/pong situation
  • wedge them in place so they don't tip to the side
I will definitely do it again. There was no observable difference in the growth of the plants or the effectiveness of the wicking systems whether tea towel, sweatshirt, long wicks, short wicks and croquet hoops, so that makes things easy. The wicks aren't reusable as the cotton is pretty disgusting after one season, but we always have some old rags, t-shirts or cloths around.

For a number of reasons we didn't have a successful tomato crop - the scary 40 degree temperatures stressed everything, the plants fruited late and didn't have time to ripen, and yes, for those on the back, I totally failed to regularly feed the poor things.

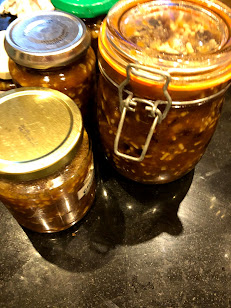
On the positive side, lots of green tomatoes means lots of green tomato chutney.

Green Tomato Chutney

  • 500g unripe tomatoes
  • 500g onions
  • 250g sultanas (or 125g plus 125g diced Bramley
  • 200g brown sugar
  • 1.5tsp salt
  • 1tsp cayenne pepper
  • 1tsp crushed cardamom seeds
  • 1tsp mustard seeds
  • 500ml vinegar - whatever type you have
Chop the tomatoes and onions, chuck everything into a pot and simmer uncovered for 45-75 minutes, depending how finely you diced things. When it's nice and reduced, put the hot churney into sterilised jars.

Ta-Da!


Sunday, 8 November 2020

Let the festivities begin!

 As warm autumn days get rarer and we're all confined to barracks for a month, it's time to think of the future and start preparations for whatever level of Christmas we're able to have. Early November is the ideal time to make mincemeat for this year's mince pies.

In my experience, there's a hierarchy of mince pies. At the bottom is shop bought, obviously*. Next is a jar of mincemeat and ready roll pastry, which gives a pleasing feeling of accomplishment. Only slightly more work than that (so VERY slightly) is making your own mincemeat and using ready roll pastry. I cannot stress enough how much of a difference this makes. It's streets ahead of the stuff in the jars, and is the work of about half an hour. Even better is fully homemade. The greatest of all is homemade by somebody else - no mess, no work! Sadly I rarely come across those.

The wonder of homemade mincemeat is that you can tweak it to your tastes.  Use the booze of your choice, go teetotal, alter the spice mix, add chopped nuts or be nut-free, use vegetarian suet if you prefer.


Jars of mincemeat

My recipe is based on the one in Rachel Allen's excellent book, Bake.

  • 3 large or 4 small cooking apples
  • 2 oranges
  • 2 lemons
  • 250g suet
  • 825g of mixed dried fruit (see note 1)
  • 125g mixed peel
  • 650g brown sugar 
  • 2-3tsp spice (see note 2)
  • 150ml dark rum or brandy or whisky or more orange juice
  • optional - chopped almons or pecans

Peel, core and chop the apples then simmer with a splash of water until cooked down to a pulp.

In a large stock pot or truly enormous bowl, mix the zest and juice of the oranges and lemons with the suet, dried fruit, mixed peel, sugar, spices, alcohol or juice and nuts if using. Add the cooked pulp, mix thoroughly and put into sterilised jars.

Leave to mature for 2-3 weeks. Easy, right?

Note 1: Rachel Allen had 275g each of raisins, sultanas and currants only.  Personally I think currants are nasty, gritty little things, and I like a touch of sharpness to cut through the sweetness. My prefered mix is  about half sultanas and the rest a mix of cranberries, sour cherries, apricots and prunes; I dice the larger fruits to similar sized pieces.  Dried fig, glacé cherries or tropical fruits can also work - pick whatever combination apeals to you.

Note 2 - Allen goes for 2tsp of mixed spice.  I grate half a nutmeg with a scant teaspoon each of ground cinnamon, ginger and cloves. I love nutmeg in Christmas food. Just use what you like, ditch what you don't. 

If you're going all out and making shortcrust pastry from scratch, my absolute favourite recipe is from my Sugarcraft tutor at college: German Paste. It's one part sugar, two parts fat, three parts flour and an egg to bind it.  Judith liked Trex or margarine for a crisper pastry, I prefer the flavour butter provides. Or go half and half, which is a great compromise. 

  • 200g sugar
  • 400g butter, Trex or combination
  • 600g plain flour
  • 1 large egg or 2 small, beaten
Put the sugar and flour in a food processor and gradually add the fat, followed by the beaten egg. Mix until it just comes together. Bring it into a ball, wrap it in clingfilm or a substitute and leave it to rest in the fridge for at least 30 minutes.

For the thinest, crispiest pastry, roll it out very thinly between two sheets of clingfilm or nonstick sheeting rather than on a floured surface and floured rolling pin. Cut out the circles and peel them off the clingfilm to put in a well greased tart tray. Add a heaped teaspoon of mincemeat and top with a pastry star. Wash with beaten egg and bake for 12-15 minutes.

The mincemeat recipe does make gargantuan quantities, so if you aren't planning to give it to friends or bake a zillion mince pies, you might prefer to halve it.  I once put out a plate of 8 that I took through to the living room while I washed up the baking tray, and when I went through with my cuppa 10 minutes later, Mark and Zach had polished off the lot. We go through a lot of mince pies.

*The exceptions to that hierarchy is Betty's of Harrogate mince pies - which are divine - and people who can't make pastry, who should stick to the ready roll rather than make tough pastry. The more you work it, flour it, roll it out, the tougher it gets. Like with scones, Less Is More for pastry.

Tuesday, 1 September 2020

And treat those two imposters just the same

This is a story of hubris, preserves and living in a sitcom.

The first thing I did after breakfast on Saturday was to water the poly tunnel and harvest some of the produce. The first batch of tomatillos were ripe, there were 17 jalapeños ready, some dwarf cucumbers and courgettes ranging from acceptable to giant marrows.

After chucking the marrows to the hens (chickens love them) I laid my haul on the garden table. I called  to Mark, "behold, I have a crop of finest Green!" in a daft pompous tone. The photo went to friends and family, Facebook and Twitter; I was extremely satisfied with the fruits of my labours. Downright smug even - look at the Earth Mother growing her veg and making preserves and pickles! How very Good Life. 


I wasn't far off the mark, but not in the way I thought.

The next thing I did was tackle the overgrown raised bed to remove some of the giant courgette leaves, the borage that had collapsed in the high winds and was drooping across the path and remove the bits that were rotting or dying back.  It's a job I'd been putting off because they are extremely prickly plants. Despite long sleeves and gloves, I had the raised bumps and  rashes I always get from the many bristles poking into me. My forearms were covered in them. I hate that job.


Mark and the kids were doing errands in Zach's car (Mum's aged Polo) so I messaged him to ask he buy a big bottle of white vinegar so I could do the pickling in the afternoon. We usually buy the glass bottles with a screw top. This time he bought plastic bottles with the small hole in the stopper (like you use for putting vinegar on your chips) because he thought I might need lots and it was cheaper. This will matter later.

I was looking forward to making the salsa verde with the tomatillos. You can't buy them easily in the UK and they are delicious. We love  Mexican/Central American food in general, really - hence the jalapenos! 

The counter was *covered* in stuff because I am a slob who lives with slobs. I couldn't be bothered clearing it all properly. I knew I could clean down a working area and ignore the rest - to Mark's horror I can do this perfectly happily. For reference, here's how it looked last week when I was making a curry:
Yes, I am ashamed. Mark can't work in this chaos because he's normal but as long as I can clear and clean a small space I'm good to go. 

First, I peeled the papery cases from the tomatillos, washed their soapy residue off, halved them and roasted them skin up in a very hot oven for 10 minutes.  I'd then pop them in the blender with half a chopped onion, a big fistful of coriander, a garlic clove, 3 chillies and the juice of a lime. Whizz it up, salt to taste, and there you've got a fantastic salsa that lasts about a week in the fridge or several months in the freezer.
Spot the food blogging in the anecdote; I'm content-rich, me.

While the tomatillos were cooling, I started on the pickling liquor for the jalapeños.

My preferred recipe is 250ml water, 250ml vinegar, a teaspoon or sugar, a tablespoon of salt and a few garlic cloves simmered to boiling, to which I  add the sliced chilli peppers off the heat and leave them to infuse/gently cook for 10 minutes before putting in a jar. It's very good, I heartily recomment it.

(See - content! Two recipes already)

I tried to prise the stopper off the vinegar bottle with the edge of a spoon so I could pour out 250ml, but it wouldn't be shifted. Damn it.  I squeezed the plastic bottle into the measuring cup.

I squeezed a bit hard.

The stopper came off with a POP and vinegar poured out at force, covering everything.

Everything.

Veg, cooking equipment, papers, a book, bowls, fruit, phone, floor, me.

I found every single scratch I got pruning back all the prickly stuff this morning. Ow.

It took me 40 minutes to clear up: wash everything down, mop the floor, rinse the fruit and veg and leave them out to dry, bin the butter in the butter dish, wash the pasta jar, lay out the papers and novel to dry, change clothes, wash up the crockery I doused.

 I was knackered and sweating. 

My (freshly washed) hair and face got covered to. I sweated VINEGAR into my EYES.

I smelled like a chip shop.

I want to be an Earth Mother type, whereas I am in fact in a slapstick sitcom or a Carry On film.

It was the hubris particularly.  “Look at my amazing monochrome veg harvest. Isn’t it gorgeous! Aren’t I such a great example,  growing and preserving things?” to a Joni Mitchell Ladies Of The Canyon soundtrack. Me in my maxi dress and wellies, tending my crops and preserving my veg.

Fast forward to vinegar drenched train wreck.

I did get a happy ending - see the jars below. 

This morning I resolved to have a less farcical experience. I went down the garden to sit in my new swing/hammock chair and read a novel. Swaying gently in the sunshine enjoying a favourite book I was feeling at one with the world.

Until the hook holding the chair gave way.

Cue title sequence.


P.S. No, I'm not kidding, yes, it hurt and I'm on painkillers and yes, it did look ridiculous and yes, I was flat on my back like an upturned tortoise.

Sunday, 5 August 2018

In a pickle

One of the things I missed most when I moved to the UK as a kid was the lack of dill pickles. The lack of good food generally, come to think of it. Sure, the chocolate was better and you get a lovely cup of tea, but the food was almost uniformly lousy, the pizza were appalling and you couldn't even get a nice crisp dill pickle to liven up your sandwich.

The North Wales culinary landscape was pretty miserable in 1985.

Things are much improved. However, I still find the dill pickles a bit hit and miss. Too sweet a lot of the time, or too floppy, or just a bit 'meh'. So I'm making my own.

As I'm not sure how they will turn out, I'm starting with two different recipes.

My new friend-of-a-friend-via-Facebook, the very ace Lisa D, suggested this particular recipe. She's an ex-pat Canadian with excellent taste in many things (i.e. we agree with each other) so that's my first attempt.

Refrigerator pickles aren't proper preserves; they are only good for 2-3 weeks. I'm not sure how many pickles I'll need in that short a time, so I'm only trying one jar for this one. What I have in the cupboard is a much smaller jar than the recipe uses so I've halved the amount of vinegar. I'm using a generous sprig of fresh dill, a peeled clove of garlic (because I like it) and a teaspoon of sea salt. I've sliced the pickles about pound-coin thickness because I prefer them thicker than her wafer thin style.


It takes about 3 minutes to do, and is an absolute doddle.  If these are good I'm going to be delighted.

I liked the idea of longer-lasting pickles too, so I'm doing a more traditional recipe with the majority of jars.

Unlike the massive farms these people seem to have, producing kilo after kilo of cucumbers that require industrial scales of production, I have one plant that escaped the slugs. Downsizing needed.
I swapped the unit of measurement from 1 cup to 1/4 of a cup, and kept proportions the same. so: 1/4 cup table salt, 1 1/4 cups of water, 2 3/4 cups of white wine vinegar, simmered for 10 minutes to dissolve the salt. I put a large sprig of fresh dill, peeled garlic and one fresh chilli pepper (also from the garden) in each jar before stuffing them as full of cucumber as possible.
Because my cucumbers aren't a specific "for pickling" cultivar, they do have more seeds than is usual for dill pickle.  I'm doing some jars with slices and some with spears that I've trimmed the seeds from to see if that keeps them crunchier.
I also read on a number of recipe sites that the blossom end of the cucumber contains enzymes that make it go floppy, so I followed that advice too and trimmed the ends off.

To allow the pickles to last long term, I put all the jars on a folded tea towel in my big stock pot, covered them with boiling water and simmered for 15 minutes. The Internet assures me that will work just as well as a pressurised canner (and obviously the Internet is always factual - ha!) so that's what I did.
Don't worry, I did add more water


When I lifted the jars out (carefully) I could see one wasn't sealed properly so we'll not store that one and eat it soon. The other 4 looked much better, bulging because of the heat, contracting to a vacuum seal as they cooled. They are the duller green I associate with pickles, and I'm very much looking forward to trying them! A shame I have to wait about a month before opening them - I promise I'll update you.

Having been away for 12 days, I had rather a glut of produce to deal with.  I have now washed, trimmed, blanched and frozen over 4kg of French beans, swapped 2 dozen quail eggs for courgette to make fritters, and enjoyed salads of tiny tomatoes with red onion.


I know I say it a lot, but I really do love my garden.